

Coil pot pottery
Materials
clay (hardening or chemical)
small dish
■ toothpick
■ water
Read Clay (pages 108-110) before you decide what kind of clay you
want to use for this project.
- Break off a lump of clay about the size of a golf ball. To form the
bottom part of the pot, flatten (see flatten, page 111) the clay
until it is about as thick as your first finger.
Push the bottom into the shape you want your pot to be (circles and
ovals work best).
Break off a lump of clay about the size of a large marble. Roll the
clay into a coil (see coil, page 110). Make the coil about as
thick as your first finger and long enough to go around the bottom
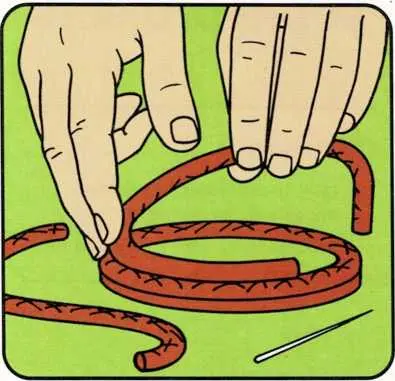
part.To start building the sides of the pot, score (see score,
page 111) one side of the coil and the edge of the bottom part.
Moisten the scored edges with water to help them stick. Now, place
the coil around the edge of the bottom part so that the scored edges
meet. Stick the ends of the coil together.Repeat step 2. Score one side of the coil you just made and the top
of the coil already in place.
Moisten the scored edges with water and stick the second coil on top of
the first one. Stick the ends of the coil together. Gently push the two
coils together so that there are no holes in the side of your pot.
- Continue rolling, scoring, and sticking on coils until the pot is as
tall as you want it to be.
If you want, you can stick one or two handles onto the pot.
Let dry (see dry, page 111). You can put flowers or clay fruits into
your pot and give it to someone you love.