
Helpful hints
The following information will help you make the projects in this
section. If a special skill is needed, the directions will tell you the
page on which that skill is explained. For example: “Stitch the edges
together with the backstitch (see backstitch, page 156).” If you do
not know how to do the backstitch, you will find directions on page 156.
Thread, needles, scissors, a ruler (or tape measure), a
felt-tip pen, a thimble, and straight pins are a few of the
basic tools needed for sewing.
The threads used most are: sewing thread, embroidery thread, and yarn.
Yarn comes in a roll. It is a thick thread used for decorative
stitching. For craft projects, yarn is often used to hold pieces of
cloth together.
Embroidery thread comes in packages. It is used for decorative
stitching.
Sewing thread comes on a spool. It is used to hold pieces of cloth
together.
Selecting the right needle is an important step in sewing. A needle
has a hole, or eye, at one end and a point at the other end. There are
different kinds of needles.
A sharp is a short, thin needle with a small eye. It’s used with
sewing thread.
A crewel is a short needle with a long eye. It’s used with
embroidery thread.
A darner is a long needle with a big eye. It’s used with thick
thread, such as yarn.
A tapestry is a short needle with a big eye. It’s also used with
thick thread.

To thread the needle, cut off a piece of thread about as long as
your arm. Cut it on an angle to make a point. Moisten the cut end and
pull it through your fingers. Push it through the eye of the needle and
pull it down so the thread won’t slip out. Make a small, tight knot at
the other end of the thread to keep it from going through the cloth.
To start a stitch, push the needle through one side of the cloth
and pull it out on the other side. Pull the thread through the cloth
until it is stopped by the knot at the end.

To finish off stitches, push the needle through to the back of the
cloth. Then make two small stitches, one on top of the other. Slide the
needle under these two stitches and pull the thread through. Cut off the
thread just beyond these stitches.
Here are seven basic stitches you should learn how to do. You can
practice these stitches on a piece of cloth or paper. Always sew with
the needle pointing away from your body.
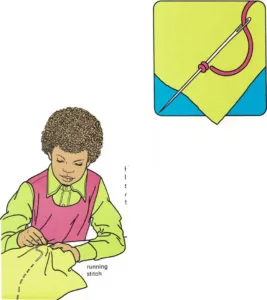
The running stitch is a short stitch used to hold pieces of cloth
together. Stitches on both sides of the cloth should be the same size
and evenly spaced. Weave the needle through the cloth four or five times
before you pull the thread through.

The backstitch is a very strong stitch used to hold pieces of cloth
together. Pull the needle and thread through the pieces of cloth, from
the back to the front. Move the needle backward about 7 inch (1 cm) from
the spot where you pulled the thread through. Now push the needle
through to the back of the cloth and pull the needle and thread through.
You have made one stitch. Push the needle through to the front of the
cloth, j inch (1 cm) in front of the stitch you just made. Take the
needle back to the end of that stitch. Push the needle in there and pull
the needle and thread through to the back of the cloth. Now push the
needle through to the front of the cloth, again inch (1 cm) in front of
the last stitch you made.
The hemming stitch is used to hold down an unfinished edge of folded
cloth. Fold down the unfinished fabric edge so the back sides of the
cloth are together. With the tip of the needle, pick up a tiny piece of
cloth near the unfinished edge. Then pick up a tiny piece of cloth from
the unfinished edge of the folded fabric. Pull the needle and thread
through both parts of the cloth. It is easier to pick up the cloth if
you slant the needle.
The overcast stitch is used to keep an edge of cloth from unraveling
or to hold pieces of cloth together. Push the needle through to the
front of the cloth, just below the edge, and pull the thread through.
Then take the thread over the edge to the back of the cloth. Push the
needle through to the front again and pull the thread through. Do this
stitch over and over until you reach the end of the edge.
The satin stitch is used to fill in a design that has been drawn on
a piece of cloth. Start at an edge of the shape you want to fill in.
Pull the needle and thread through to the front of the cloth. Stitch
from one edge to the opposite edge until the shape is filled in. Don’t
pull the thread too tight or the cloth will bunch up.
The chain stitch is used to decorate a piece of cloth. Push the
needle through, from the back to the front of the cloth. Then pull the
thread through. Now push the needle in next to the spot where the thread
comes out. Pull the thread through to the back of the cloth until there
is a small loop left on the front of the cloth. Hold the loop down with
your thumb and push the needle through to the front of the cloth, inside
the loop. Push the needle in beside the spot where you pulled the thread
through. Pull the thread through to the back of the cloth, making
another small loop inside the first loop.
Keep making loops inside of loops until you have a long chain. To finish
off the chain, make a small stitch over the last loop.
The lazy daisy stitch is made somewhat like the chain stitch. Make a
loop, as you did in the chain stitch. Hold the loop down with your
thumb. Now push the needle back through the loop and pull the thread
through to the front of the cloth. Push the needle in again, just
outside the loop. Pull the thread through to the back of the cloth. Poke
the needle through to the front of the cloth wherever you want the next
loop. Repeat this until you finish the daisy design.
