
Helpful hints
The following information will help you make the projects in this
section. If a special skill is needed, the directions will tell you the
page on which that skill is explained. For example: “Cut slits up to
this line (see slit, page 37).” If you do not know how to slit
paper, you will find directions on page 37.
Scissors, a pencil, and a ruler are the only tools you
will need to do these paper projects. If you are left-handed, you can
get left-handed scissors at an art supply store. Transparent tape
and white glue are best for fastening paper together.

bend
Fold paper by bending one edge over toward another edge. Then rub
your thumb along the folded edge to make a sharp crease.
Pleat paper by folding it forward and backward in narrow strips.
Scoring helps you to fold stiff paper or to make a curved fold. Put
a magazine or newspaper under the paper you are going to score. Draw a
line to follow. Then go over the line with an old ball-point pen or the
tip of your scissors. Press hard enough to make a mark in the paper.
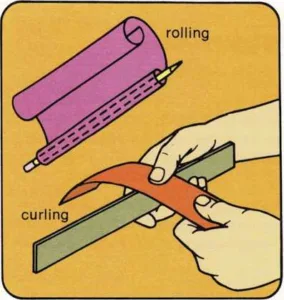
Roll paper by wrapping it around itself or around a pencil.
Curl paper by pulling it across the edge of a ruler or the edge of a
table.

Fringe paper by cutting into an unfolded edge.
Inside cuts let you cut out an inner part of the paper. Bend the
paper and make a little cut along the fold. Carefully poke one blade
of your scissors through the cut. Hold the scissors still and move the
paper as you cut.


Slit paper by cutting into a folded edge. Do not cut all the way to
the unfolded edge. The deeper you want the slit, the closer you must cut
to the folded edge.
Helpful hints
(continued from page 37)
To square a piece of paper, fold one corner to the opposite edge.
The two edges of the paper should meet evenly. Cut off the leftover
part.
The folded section is a triangle. Open the triangle up and you have
a square. The piece you cut off is a rectangle.

Circles can be made by drawing around any round object, such as a
coin, a saucer, or the rim of a cup.
A cone is made from a circle. First, cut out a circle. Then cut from
the edge to the center of the circle. Overlap the cut edges. Fasten them
together and you have a shape called a cone. You can change the shape of
the cone by cutting out triangular sections from the circle. The larger
the section you cut out, the taller the cone will be.

